Filesystem Provider 
Music Assistant has full support for reading your own (local) music files on disk or a remote server and will catalog it into the library, allowing playback to all player providers supported by Music Assistant.
When streaming providers are also availabe in MA linking will only occur when the same item is found in the "Library" of that streaming provider. However, additional tracks and albums will be seen in various views or via the global search which can then be added separately to the MA Library.
Features
| Subscription FREE | Yes |
| Self-Hosted Local Media | Yes |
| Media Types Supported | Artists, Albums, Tracks, Playlists, Audiobooks, Podcasts |
| Recommendations Supported | No |
| Lyrics Supported | Yes |
| Radio Mode | No |
| Maximum Stream Quality | Lossless FLAC 192 kHz, 24 bit |
| Login Method | Password or None |
Other
- Searching the catalogue
- Local music is automatically included in the MA Library
- Files are not favourited by default. All items can be seen if the "favourite" filter (the heart) is deselected. Items can then be favourited as desired
- If streaming providers are also connected, then the media will be automatically linked and completed with info from those streaming provider(s)
- On playback, when tracks are linked across providers (or within the same provider) the highest quality version is used automatically
- It is possible to add multiple filesystem providers
Configuration
Separate providers must be added for Music, Audiobooks and Podcasts.
Your files are on a disk/folder of the device running Music Assistant Server
If your files are actually stored on the device running Music Assistant, for example the /media folder in Home Assistant OS, you should select the filesystem (local disk) option and enter the path to the files.
Note
For Home Assistant OS you can only access the /media folder. Docker users can mount their own folder paths. You can not mount a folder from Home Assistant into the /media path.
Your files are on a remote share, such as a NAS or other (SMB/CIFS) server
Music Assistant has support for SMB (also known as samba or CIFS) shares and DFS. Select the music provider "Filesystem (remote share)" and configure the (fqdn) hostname (or alternatively the IP address) to your server, the name of the share and optionally any subfolders.
Settings
In addition to the settings outlined above to configure the provider there are additional settings available for this provider (note certain options will be gryed out depending upon the content type selected):
- Content type in media folder(s). This setting defines the content type of the provider and is necessary for Music, Audiobooks and Podcasts to be correctly identified
- Action when a track is missing the Albumartist ID3 tag. In the first instance tag the files correctly. MA needs an album artist defined so that the item can be added correctly to the database. Instead of skipping tracks that do not have this information, this setting defines how the situation should be handled. By default,
Various Artistswill be used but the other options available areTrack ArtistandFolder name (if possible). - Ignore playlists with album tracks within album folders. Some users have a playlist per album. For large collections this results in an unusable Playlist View. To avoid this situation, this setting, which is enabled by default, will result in playlists which are more than one level below the root folder of the provider to be ignored
- Sync Library Artists/Albums from this provider to Music Assistant. Whether to synchronize all artists/albums from the local provider.
- Import tracks/files into the Music Assistant library. Define if the import of tracks/files is desired. When not importing into the library, tracks can still be manually browsed using the Browse feature. Note that by adding a Track into the Music Assistant library, the track artists and album will always be imported as well
- Import playlists (m3u files) into the Music Assistant library. Define if the import of playlists (m3u files) is desired. When not importing into the library, they can still be manually browsed using the Browse feature.
- Import Podcasts/Audiobooks into the Music Assistant library. Define if the import of Podcasts/Audiobooks is desired. When not importing into the library, items can still be manually browsed using the Browse feature.
- Automatic sync interval for Artists/Albums/Tracks/Playlists/Podcasts/Audiobooks. Various time periods are selectable or it can be disabled
- SMB Version. The SMB protocol version to use. SMB 3.0 or higher is recommended for better performance and security. Use Auto to let the system negotiate. The options are
Auto,SMB 1.0,SMB 2.0,SMB 2.1,SMB 3.0 [default], andSMB 3.1.1 - Cache Mode. Cache mode affects performance and consistency. 'Loose' provides better performance for read heavy workloads and is recommended for music libraries.. The options are
Strict,Loose (Recommended) [default], andNone
Known Issues / Notes
- Write access to the share is required in order to edit or create playlists which are stored locally. You can still save playlists into the MA built-in provider if only read access is granted
- If you are using the remote share connection, be aware that use of SMB1 (which is very old) is not recommended. If the connection keeps failing, look in your NAS settings to see if you can somehow disable SMB1
- Use the following naming convention for local artwork
- Artist thumb: folder.jpg or artist.jpg (or png)
- Album thumb: folder.jpg or cover.jpg (or png)
- Fan Art (used as background in banners): fanart.jpg (or png)
- Logo (used on Artist view): logo.png
- Artist thumb, Fanart and Logo should be in the folder with the artist name. Album thumbs should be in the folder with the album name or in the disc folders below that. More about artwork file types can be found here https://kodi.wiki/view/Artwork_types
- Embedded album thumbs will be extracted from audio files. However, you can improve performance and save disk space by providing a single local artwork file vs. embedding the same artwork in all files
Local Artwork is Optimal
Using embedded images on every track of the same album is suboptimal for both disk space and performance. Use a single folder.jpg in the album's folder instead
- Artwork which needs to be downloaded will be done very slowly in the background. You can force the download by selecting "Update Metadata" from the ⋮ menu in the banner at the top of a view
- Local tracks and albums will be linked to the same tracks or albums on any provider (local or streaming). Note that same is not simply same name. The tags are reviewed to ascertain whether it is indeed the exact same track. Without tag information MA will attempt to identify identical tracks based on the other information it has such as artist name, album, and track length. However, poor tag information may lead to poor matches
- A setting, enabled by default, allows the skipping of playlists which are more than one level below the root (normally this is the album folder). This is preferred as these playlists (normally all album tracks in the folder) serve no function in MA and clutter the Playlists view. Excessive numbers of playlists can have a negative impact on other parts of the MA experience
- Folders commencing with an underscore will be ignored
- Text files containing song lyrics are supported. These files must be named identically to the track filename and in the same folder but with a
.lrcfile extension. The lyrics will be loaded when playback commences - To minimise the chance of problems, folders should follow the /artist/album structure and the folder names should match the artist and album names as tagged with any illegal characters removed (e.g. AC/DC should be in a folder ACDC)
- Files placed into a random structure will be imported but no other data will be able to retrieved from the folder names and other problems may occur
Tagging Files
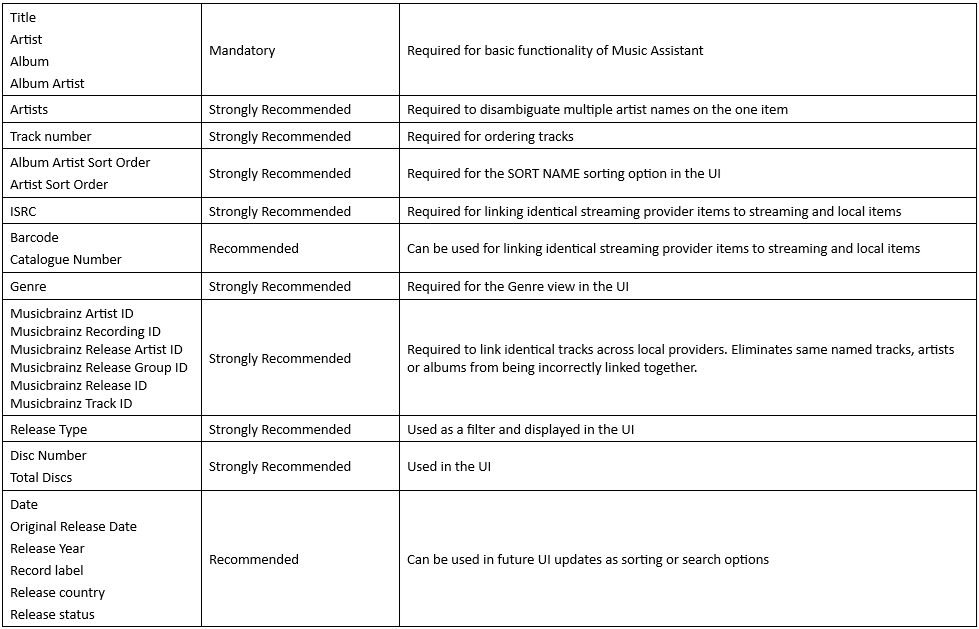
- It is very important that all of your audio files contain proper ID3 tag information. The more comprehensive the tagging the better the results will be when using MA. For this reason it is strongly recommended that all files are tagged with MusicBrainz Picard. This will ensure consistency and completeness of the tags that MA needs to work best. Other programs such as Mp3Tag are often also based on the Musicbrainz catalog and can work as well provided they include ISRC and all MBID tags
- Tags must have multiple items separated by a semi-colon (this is the only tag splitter supported). In Picard this is an option in OPTIONS >> TAGS >> ID3. Also in that section ensure V2.3 is used to avoid problems
- MA requires the Album Artist tag to be set. If you do not have that tag set then what happens to those tracks when the provider is scanned depends on the
Action when a track is missing the Albumartist ID3 tagsetting for the local provider - For multi-artist tracks it is important that the
ARTISTStag (as distinct fromARTIST) is set, which is semi-colon delimited list of the artists on the track. If this tag is not set MA will attempt to parse the artist names from theARTISTtag but if unusual or non-English joining words or symbols are used then this process may fail - Music Assistant puts you in control by fully trusting the ID3 tags you provide, only additional information is scraped from metadata providers
- Music Assistant has support for both embedded artwork and artwork stored in a common folder structure of Artist \ Album and
.nfofiles with enhanced metadata are also supported - To minimise the chance of problems with MA you should follow the Kodi guidelines here https://kodi.wiki/view/Music_tagging Just about all the tips, tricks and suggestions on that page are applicable to MA and if you follow it all to the letter you will have a much better experience
- For multi disc albums it is recommended (but not required) to add folders named “Disc 1”, “Disc 2”, etc beneath a folder with the album name. Artwork for the album can be added to the top level album folder or in the disc folders
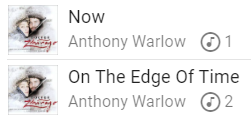
- If there is nothing added to the disc tag then the disc number will not be shown in the display

Tags used by MA
Manually Adjusting Tags
Danger
The following should be considered as advanced. Making manual changes to the tags can have undesired effects to the MA library if you make mistakes. Additionally, matching may not occur or may occur incorrectly between providers
Normally it is best to leave the Picard tags unchanged. However, some people do not agree with Musicbrainz that remasters are the same as the original recording. To separate these out you can edit the tags as follows:
- Remove MusicBrainz Release ID and Recording ID
- Keep MusicBrainz Artist ID
- Remove ISRC (as that is also used as strong identifier for tracks)
- Remove barcode (as that is also used as strong identifier for albums)
- Because there is no version specific ID3 tag, place the version between brackets in the title. For example, Great Song (Vinyl Rip)
